

 Author:
The quickest route to learning how to improve batting in cricket is simple: fix your basics, practise a few targeted drills often, and film yourself to see what changes.
This guide is for junior and club batters, and for parents helping them at home. You get 12 cricket batting tips, home and net drills, the 5 core shots and a simple 4-week plan.
We build CricVision, an AI app that splits a net session into ball-by-ball clips with skeleton tracking, so every tip in this guide points to something you can see on your own footage.
Work through the sections in order to improve your batting step by step. Each one builds on the last, and every fix comes with a simple way to check it on video.
Key takeaways:
- Fix grip, stance, head position and balance before you work on shots.
- Short drills done most days beat one long, random session a week.
- Film from the same two angles every week so your clips compare fairly.
- Fix one fault at a time, then re-film to check the change has stuck.
- Wear a helmet for every drill that uses a hard ball.
The 5 Basics of Good Batting Technique
Good batting rests on five basics: grip, stance, backlift, head position and balance. Most faults that show up in your shots start in one of these five, not in the shot itself.
Anyone working out how to improve batting in cricket should start here. A shot is only ever as good as the position you play it from.
The table below shows what good looks like for each basic and the usual fault to watch for.
| Basic | What good looks like |
|---|---|
| Grip | Hands together and relaxed, with the V’s between the splice and the outside edge. Watch for the top hand turning too far round. |
| Stance | Side-on, feet about shoulder-width apart, knees soft. Watch for weight drifting back onto the heels. |
| Backlift | Smooth and consistent, lifted towards the slips. Watch for the bat coming down from gully. |
| Head position | Still, eyes level, over the front foot at contact. Watch for the head falling towards the off side. |
| Balance | Weight moves into the shot and you hold the finish. Watch for falling away after contact. |
If one basic is clearly off, fix it before anything else. The other four often improve along with it.
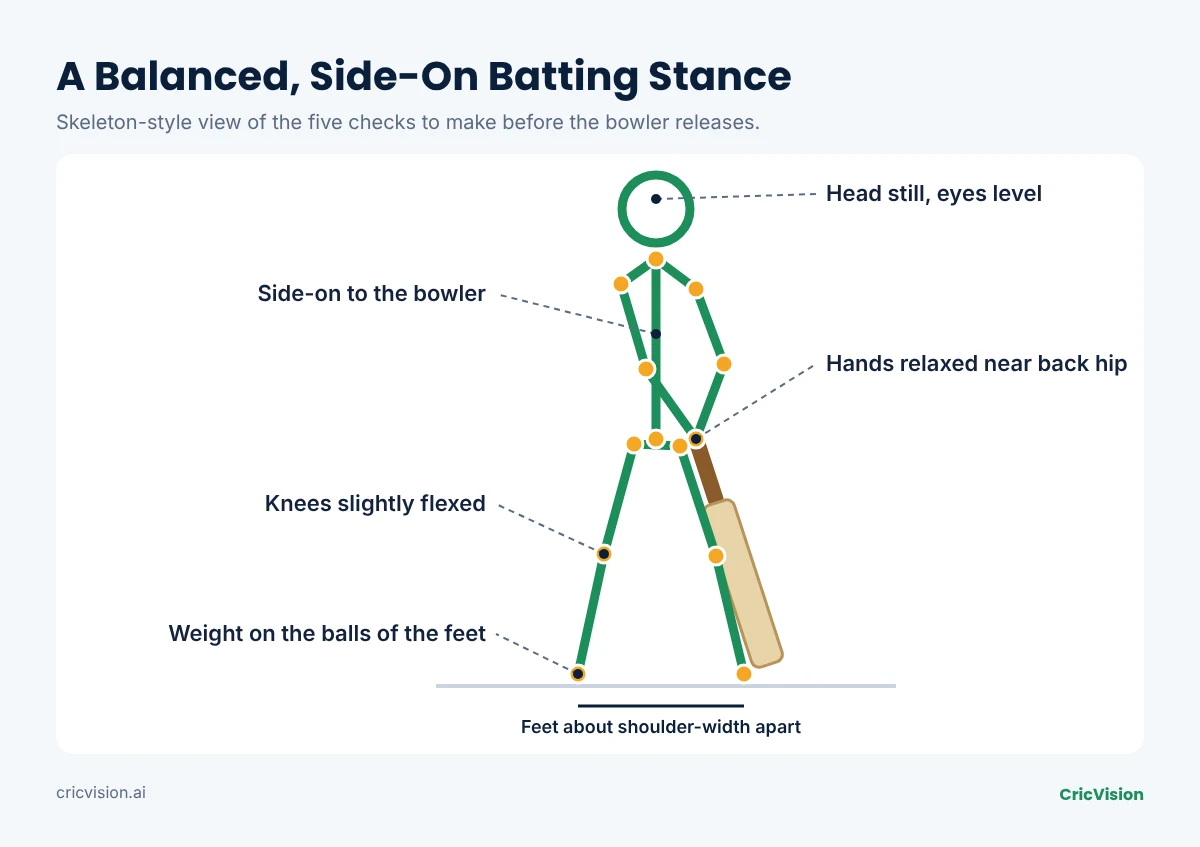
What is the correct batting stance?
The correct batting stance is side-on, with feet about shoulder-width apart and weight on the balls of your feet. Keep your knees slightly flexed, eyes level and head still as the bowler runs in.
Some good players use a more open stance. That is fine, as long as you can move forward and back easily and your head stays still at release.
Grip and backlift are covered in tips 1 and 3 below, each with a drill you can start today.
12 Tips on How to Improve Batting in Cricket
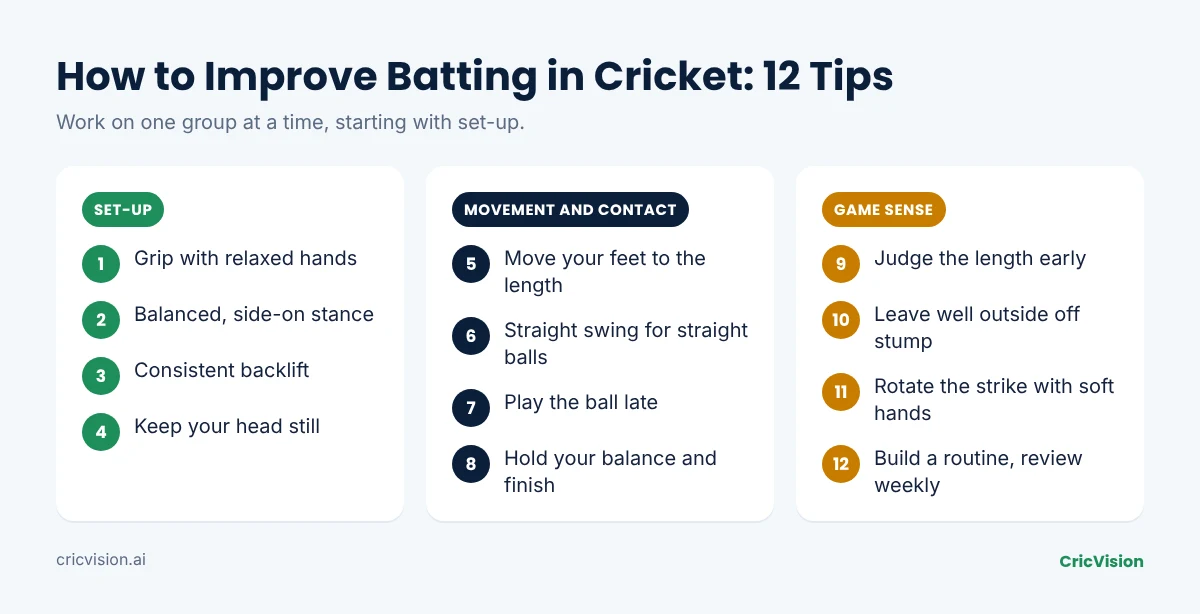
The 12 tips below fall into three groups: set-up, movement and contact, and game sense. Work on one group at a time, starting with set-up, rather than trying to change everything in one net session.
Most players learning how to improve batting in cricket try to fix too much at once. Pick the tip that matches the way you get out most often and start there.
Cricket batting tips for your set-up (tips 1 to 4)
These four cricket batting tips shape everything that happens after the bowler lets go of the ball.
- Grip with relaxed hands. Keep both hands close together, with the V’s of thumb and finger between the splice and the outside edge. A tight grip slows the bat down.
- Take a balanced, side-on stance. Set your feet about shoulder-width apart with soft knees, then shadow a few forward and back steps to check you can move both ways.
- Keep your backlift consistent. Lift the bat towards the slips the same way every ball. A backlift that comes from gully drags the bat across the line.
- Keep your head still. Your eyes should be level and your head still as the bowler releases, because a moving head makes judging length much harder.
Movement and contact (tips 5 to 8)
- Move your feet to the length. Go forward to full balls and back to short ones, and commit early. A half-step either way leaves you stuck in between.
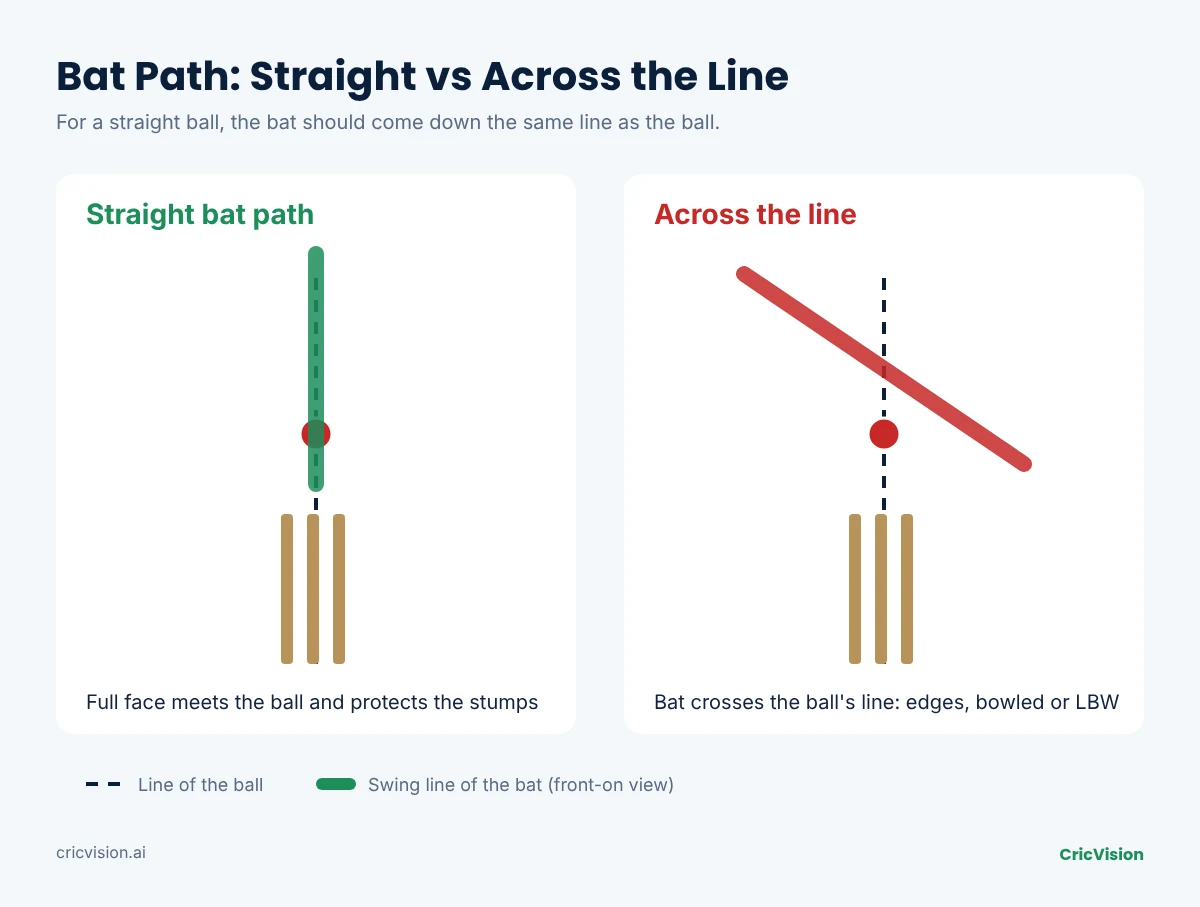
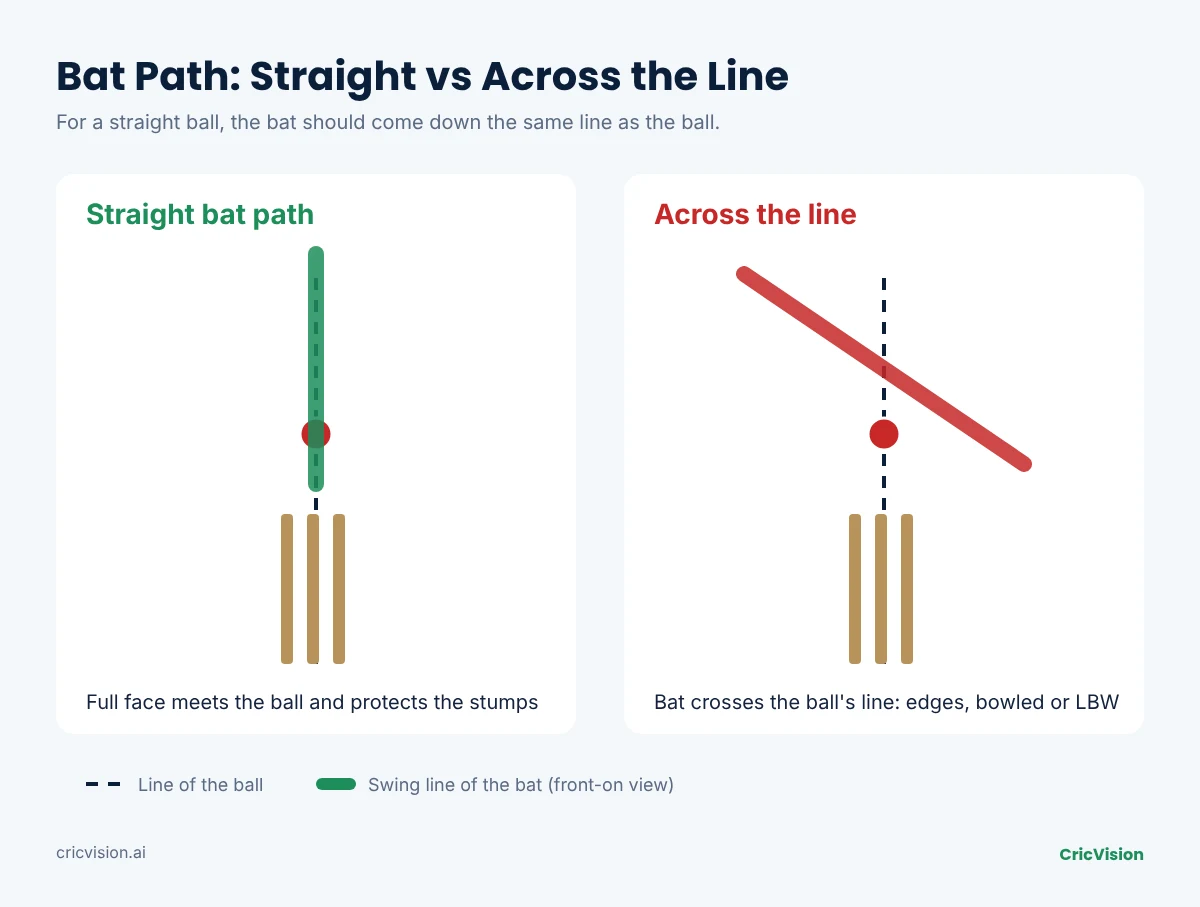
- Keep the bat path straight for straight balls. A straight bat gives you the full face to hit with and protects your stumps. Practise it with hanging-ball straight drives.
When our team reviews batting clips frame by frame, the head falling towards the off side just before contact is easy to miss at full speed. In slow motion it is the first thing you notice.
- Play the ball late, under your eyes. Let the ball come to you rather than reaching for it. Contact under your eyes gives you control and fewer edges.
- Hold your balance and finish the shot. Swinging harder is not the same as more bat speed. A smooth swing that stays balanced is usually quicker, and you can learn to increase your bat speed safely increase your bat speed safely.
Game sense and routine (tips 9 to 12)
- Judge the length early. Decide full, good or short as soon as you can after release. The call-the-length drill below trains exactly this.
- Leave well outside off stump. Chasing wide balls is an easy way to get out. Learn where your off stump is and let those balls go past.
- Rotate the strike with soft hands. Loosen your bottom hand to drop the ball into gaps for quick singles. It keeps the score moving and the pressure off.
- Build a routine and review your footage. Use the same short routine between balls, and watch your clips once a week. Small faults show on video long before they cost you in matches.
Use this table as a quick reference for each tip and the drill that trains it.
| Tip | Drill to practise it |
|---|---|
| 1. Grip with relaxed hands | Top-hand wall rebounds |
| 2. Balanced, side-on stance | Shadow batting |
| 3. Consistent backlift | Mirror backlift checks |
| 4. Still head | Shadow batting with eyes on a target |
| 5. Feet to the length | Call the length |
| 6. Straight swing for straight balls | Hanging-ball straight drives |
| 7. Play late | Hanging ball |
| 8. Balance and finish | Slow-motion shadow drives |
| 9. Judge length early | Call the length |
| 10. Leave well | Leave-only net overs |
| 11. Soft hands | Bottom-hand control drill |
| 12. Routine and review | Weekly filming |
Start with the first row you struggle with, not with row one.
Batting Drills at Home and in the Nets
The best batting drills are short and repeatable: about 10 to 15 minutes at home on most days, plus one or two focused net sessions a week. Regular small sessions build habits faster than one long one.
Drills are where most of the real work on how to improve batting in cricket happens, because they repeat one movement until it becomes automatic.
Wear a helmet and full protective gear for any drill that uses a hard ball.
Drills you can do at home alone
- Shadow batting: play shots in front of a mirror without a ball for 5 to 10 minutes, watching your head and feet.
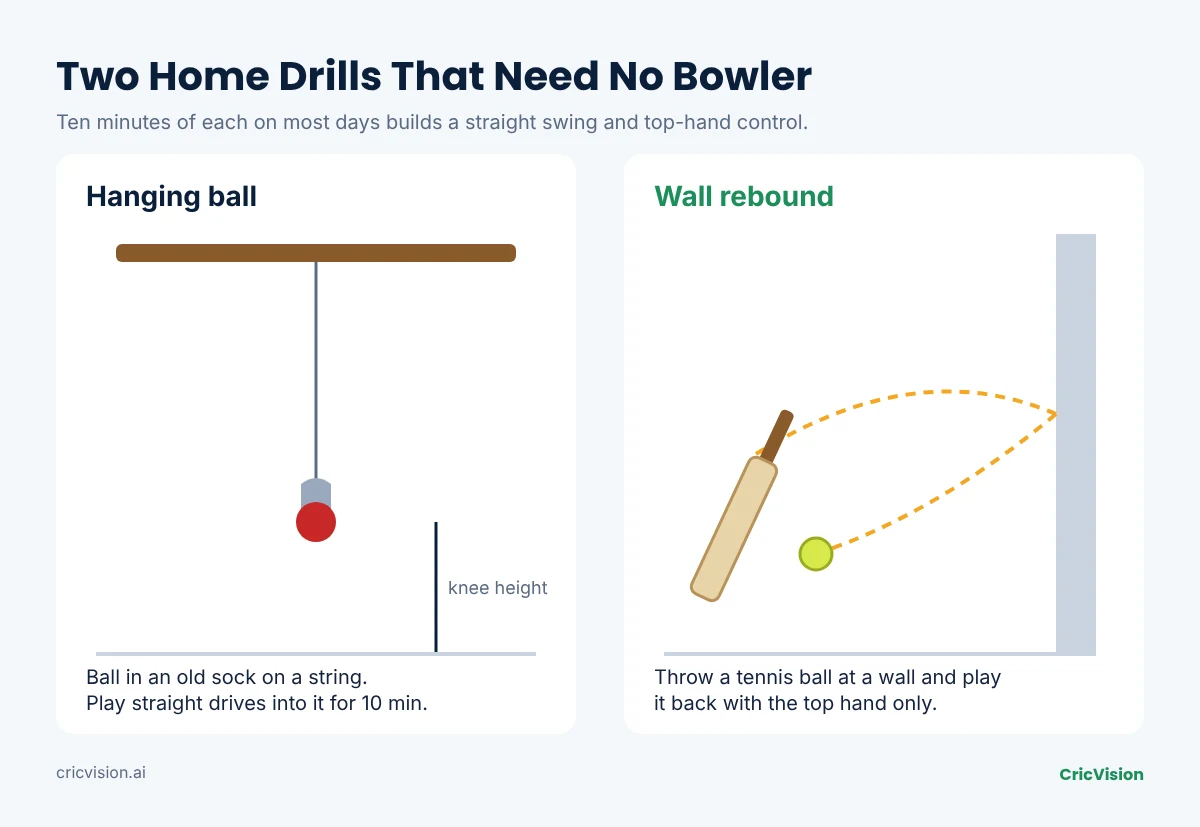
- Hanging ball: hang a ball in an old sock from a beam at about knee height. Play straight drives into it for 10 minutes to train a straight swing and playing late.
- Wall rebound: throw a tennis ball at a wall and play it back with your top hand only. It builds top-hand control and stops the bottom hand taking over.
- Bottom-hand control: hold the bat in your bottom hand and push soft feeds into the ground to learn soft hands.
Drills for net sessions
- Ask a partner for throwdowns with a sidearm, a plastic ball thrower that adds pace. Keep each set to one line and length so you groove one shot.
- Set a bowling machine to one line and length and repeat a single shot. Start slow and raise the pace only as your timing improves.
- Call the length: say full, good or short out loud before the ball pitches. It trains your eyes to judge length early.
Here is a quick summary of each drill, where to do it and what it fixes.
| Drill | Where, how long and what it fixes |
|---|---|
| Shadow batting | Home, 5–10 min with a mirror. Fixes footwork and head position. |
| Hanging ball | Home, 10 min with a ball in a sock. Fixes a crooked swing and reaching for the ball. |
| Wall rebound | Home, 10 min with a tennis ball. Builds top-hand control. |
| Throwdowns | Nets, 15–20 min with a sidearm and helmet. Sharpens timing against pace. |
| Bowling machine | Nets, 15–20 min with a helmet. Grooves one shot at a time. |
| Call the length | Nets, 10 min with a partner or feeder. Trains you to judge length early. |
Pick two home drills and one net drill each week to become a better batter faster.
How to Play the 5 Core Shots
Five shots cover most balls you will face: the front-foot defence, the straight drive, the cover drive, the pull shot and the sweep. Learn them in that order, because each one builds on the last.
Each shot uses the same batting technique basics: head still, feet to the ball and a balanced finish.
This table shows which ball each shot is for and the one cue to remember.
| Shot | When and how to play it |
|---|---|
| Front-foot defence | Good length on the stumps. Front foot, bat beside the pad, soft hands. |
| Straight drive | Full ball on the stumps. Front foot, full face, head over the ball. |
| Drive through the covers | Full ball outside off stump. Front foot, lead with the head and front shoulder. |
| Pull shot | Short ball at the body. Back foot, get inside the line, roll the wrists. |
| Sweep | Full spin on or outside leg stump. Front knee down, head over the ball, bat horizontal. |
Front-foot defence
Play it to a good-length ball on the stumps. Stride to the line, keep the bat beside your front pad and use soft hands so the ball drops at your feet.
Straight drive
Play it to a full ball on the stumps. Lead with your head and follow through towards the bowler.
Cover drive
Play it to a full ball outside off stump. Lead with your head and front shoulder and let the ball come to you.
Pull shot
Play it to a short ball at your body. Move back and inside the line, roll your wrists to keep the ball down, and always wear a helmet.
Sweep
Play it to a full spinning ball on or outside leg stump. Get your front knee down, keep your head over the ball and the bat horizontal.
How to Check Your Batting With a Phone Video
Filming one net session a week from the same two angles is the most reliable way to see whether a change in your batting has worked. Your eyes miss fast faults; slow motion does not.
It is also the simplest habit for anyone serious about how to improve batting in cricket, because it turns guesswork into evidence you can compare.
- Put your phone on a tripod at about waist height.
- Film side-on from square leg or point, and front-on from behind the bowler’s end netting.
- Use slow motion or at least 60 frames per second.
- Film 24 to 36 balls, so you see a pattern rather than one bad shot.
- Review four things: head position, feet, bat path and the point of contact.
In CricVision we ask you to calibrate the stumps before analysis, because camera position changes what the AI sees. Film from the same spot every session so your weekly clips compare fairly.
CricVision analyses your stance, backlift, swing line, footwork, head position, bat speed and impact frame from that phone video. You can download it free on iOS and Android.
Coaches can see every player’s clips, notes and reports on one dashboard. To go deeper, find out how to analyse your batting with AI analyse your batting with AI
How to Improve Batting in Cricket in 4 Weeks: A Practice Plan
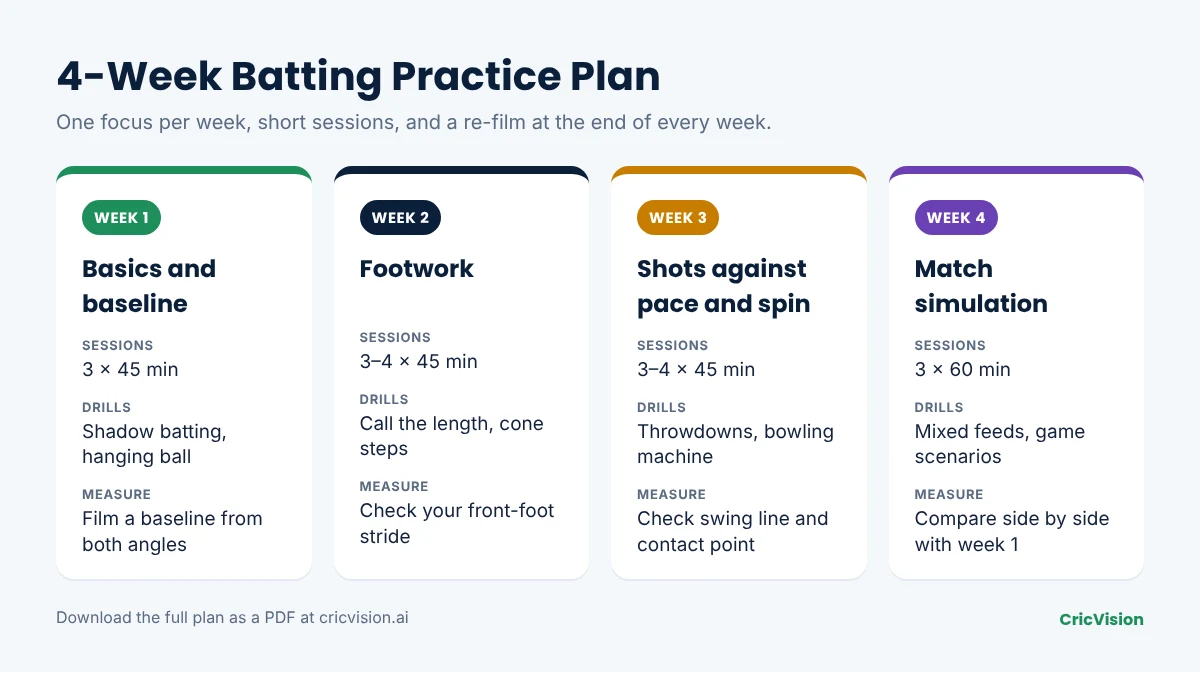
A 4-week plan works best when each week has one focus, three or four short sessions and a re-film at the end of the week. Comparing week 4 clips with week 1 shows exactly what has changed.
Here is a simple plan you can follow from your next session.
| Week | Focus, sessions and drills |
|---|---|
| Week 1 | Basics and baseline: 3 × 45 min of shadow batting and the hanging ball. Film a baseline from both angles. |
| Week 2 | Footwork: 3–4 × 45 min of call the length and cone steps. Check your front-foot stride on video. |
| Week 3 | Shots against pace and spin: 3–4 × 45 min of throwdowns and bowling machine work. Check your swing line and contact point. |
| Week 4 | Match simulation: 3 × 60 min of mixed feeds and game scenarios. Compare your clips side by side with week 1. |
Session lengths are a starting point, so adjust them to your age and workload. Keep the same batting drills within each week so the only thing changing is you.
Write one line after every session: what you worked on and what the video showed. Tracking batting improvement this way helps you track player performance across a season.
Common Batting Mistakes and How to Fix Them
Most batting mistakes start with the head and feet, not the hands. Fix your position first, and many faulty shots correct themselves without you changing the swing at all.
These six faults are among the most common, each with a fix and a drill to practise it.
| Mistake | How to fix it |
|---|---|
| Falling over to the off side | Keep your head over the front foot. Drill: shadow batting in a mirror. |
| Playing across the line | Bring a straight swing to straight balls. Drill: hanging-ball straight drives. |
| No front-foot stride | Stride to the pitch of the ball. Drill: call the length. |
| Backlift from gully | Lift the bat towards the slips. Drill: mirror backlift checks. |
| Head moving at release | Keep your head still and eyes level. Drill: shadow batting with eyes on a target. |
| Going hard at the ball | Play late with soft hands. Drill: top-hand wall rebounds. |
We added multi-clip analysis to CricVision so a batter can put this week’s shot beside last month’s. Seeing two clips side by side shows whether a fix has stuck or slipped back.
The most useful batting tips for beginners are often the simplest. One fixed fault beats ten half-learned ones.
So when you plan how to improve batting in cricket, choose the mistake that gets you out most and start there. If a fault comes with back or knee pain, see a qualified coach or physiotherapist first.
Frequently asked questions
How can I improve my batting quickly?
Pick one fault, drill it for 10 to 15 minutes a day, and film before and after. Head position and footwork usually give the fastest visible change, because so many other faults start there.
How do I practise batting at home alone?
Use drills that need no bowler: shadow batting, a hanging ball, tennis-ball wall rebounds and one-hand drills. Ten to fifteen minutes on most days is enough to build better habits.
How do I stop getting bowled?
Being bowled usually comes from playing across the line or your head falling away. Play straight balls with a straight bat, stride to the pitch of the ball and keep your head over it.
How long does it take to improve batting in cricket?
One focused fault often shows a visible change on video within 3 to 4 weeks. When learning how to improve batting in cricket, match results take longer, so judge progress on video first.
How many hours a day should I practise batting?
Quality matters more than hours. Short, focused sessions with rest days work better than long, tired ones, and junior players should follow their coach’s workload advice.
Can AI video analysis help junior cricketers bat better?
Yes, as feedback alongside a coach. AI analysis shows stance, bat path and head position frame by frame, which makes faults easier to see, but it does not replace coaching or match experience.
Next Steps: Film One Net Session This Week
Improving your batting is a simple loop: fix the basics, drill one fault most days and film your progress every week. That loop is the core of how to improve batting in cricket at any level.
Use the 12 tips and the 4-week plan as your guide, and add a new focus only when the last one has stuck.
Your next step: download CricVision free and analyse your next net session. Coaches and academies can Book an Academy Demo to bring the same analysis to every player.